App development with Android-x86 on Virtualbox
I initially used the Android emulator when I first started developing an Android application. I quickly realized, however, that its performance was not quite up to par with efficient development practices. I looked for alternatives, and at last a wonderful device came to my wireless provider, AT&T, in the form of the Motorola Atrix. Development speed took a great leap.
I realized though that there are still times when some sort of virtual device is important for developing Android apps. For one, with virtual devices I can test the application on multiple versions of Android, from the latest Gingerbread or Honeycomb releases to the first incarnations of Android, all without purchasing a single device. I also don't have to worry about crippling my phone with extensive tweaking. And perhaps most importantly, I can run the virtual device directly from the computer, without having to leash my phone to the computer by the USB cable.
Of course, I couldn't go back to the emulator, at least in its current form. I did hear about Android-x86, a port of Android to the x86 platform that offered considerably improved performance. Best of all, it can hook up with the ADB for seamless Android debugging. The challenge was actually getting all the correct settings, and in case you're interested in doing the same, I've gathered here a few tips to help speed your development process.
Installing Android-x86 in a virtual machine
I realized though that there are still times when some sort of virtual device is important for developing Android apps. For one, with virtual devices I can test the application on multiple versions of Android, from the latest Gingerbread or Honeycomb releases to the first incarnations of Android, all without purchasing a single device. I also don't have to worry about crippling my phone with extensive tweaking. And perhaps most importantly, I can run the virtual device directly from the computer, without having to leash my phone to the computer by the USB cable.

Of course, I couldn't go back to the emulator, at least in its current form. I did hear about Android-x86, a port of Android to the x86 platform that offered considerably improved performance. Best of all, it can hook up with the ADB for seamless Android debugging. The challenge was actually getting all the correct settings, and in case you're interested in doing the same, I've gathered here a few tips to help speed your development process.
Installing Android-x86 in a virtual machine
- Download the Android-x86 generic iso file. Most recently I tested a nightly build from the Gingerbread (Android 2.3) version. I used it with VirtualBox 4.1.2 on Win7.
- Create a VirtualBox machine with the following settings: OS Type Linux, 512MB RAM, Bridged network adapter, 2GB hard drive, and CD pointed to the iso file. As you might imagine, the sizes can all be adjusted to your liking.
- Start the machine and choose to install it to the hard drive. In the partition manager, I created a Linux partition for the entire space, flagged it to be bootable, and formatted as ext3. I also made a fake SD card, which is important for installing some applications, and gave it 200MB of space. Note that on previous versions, you had to leave enough space from the ext3 partition to create the SD card, or else it would silently fail, but the new version seems to take care of that. It might also be helpful to choose to make /system writeable for debugging/tweaking.
- Shutdown the system and unmount the iso file.
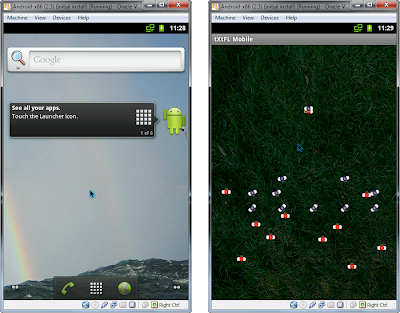
- After booting, choose Machine > Disable mouse integration to make the mouse visible.
Adjusting Android-x86 screen resolution
- The screen orientation of Android-x86 is in landscape mode, but you may prefer portrait mode. To add this configuration, close VirtualBox completely and open the .vbox file in the machine folder found in the the VirtualBox VMs directory (most likely in your user directory). In the <ExtraData> section, add the following line: <ExtraDataItem name="CustomVideoMode1" value="400x600x16"/> or some other multiple of 320x480. Other ratios work but seem to have poorer performance. Save and close the file.
- Restart VirtualBox and reboot the machine. At the boot screen, press "e" to view the command-line configuration, and "e" again to actually edit it. Where the line has DPI=240, change it to DPI=160, and add vga=ask to the end of the line. Press Enter and then "b" to boot with this configuration. Changing the DPI allows the device to adopt a more natural size and resolution similar to what you would actually see on a phone. During boot you'll be prompted to see available resolutions and can choose the number for the resolution you entered.
- Optionally, you can avoid having to retype all of this with each reboot by editing the GRUB menu list. After booting, press Alt-F1 to enter the command line, and then mount the grub folder as follows: Enter su, then mkdir /data/fs, then mount -t ext3 /dev/block/sda1 /data/fs. Next edit the grub.lst file (eg vi /data/fs/grub/menu.lst, if you're familiar with vi) with the changes from above.
Connecting Android-x86 to the Android developer kit
- To connect the virtual machine to your Android development platform, you'll simply need to connect to the machine from ADB. To find out your IP address, press Alt-F1 in the machine and then type netcfg at the command-line, which should show the IP address on your local network on the eth0 line (eg 192.168.x.y).
- Open a command-prompt in the directory with adb.exe (eg \path\to\android-sdk-windows\platform-tools). Enter adb connect [ip address], and you should see "connected to [ip address]". In DDMS, your device should also now appear.

Comments
vboxmanage setextradata "ANDROID-VM" "CustomVideoMode1" "768x1024x16"
vboxmanage setextradata "ANDROID-VM" "CustomVideoMode2" "1024x768x16"
vboxmanage setextradata "ANDROID-VM" "CustomVideoMode3" "600x800x16"
...
Would keep It permanently in config file.
"ANDROID-VM" is the name given of my virtualMachine
Regards.
I found that I had to completely shut down VirtualBox (both the virtual machine and the Manager) before making any edits to the xml file to make sure my customizations didn't disappear.
Good to know I can use the vboxmanager utility too!
I would completely pop in and drop a friendly note. . It is great stuff indeed.
I also wanted to ask..is there a way to subscribe to your site via email?
Android App Development
Please assist.
Thanks